Improving your Search Engine Optimisation (SEO) is as easy as learning some simple tricks to improve your writing. Image optimisation is one such simple trick that many miss.
There’s something inherently easier about writing an article without any images. You can dash one off at the speed you type, especially if you’re writing on a topic you’re knowledgeable in. Adding in images is pernickety, laborious and frankly, boring. However, image optimisation is a tool worth mastering to improve the quality, and indeed the SEO, of your SEO writing.
Images bring an article to life. Take this image we’ve used for this article as an example:
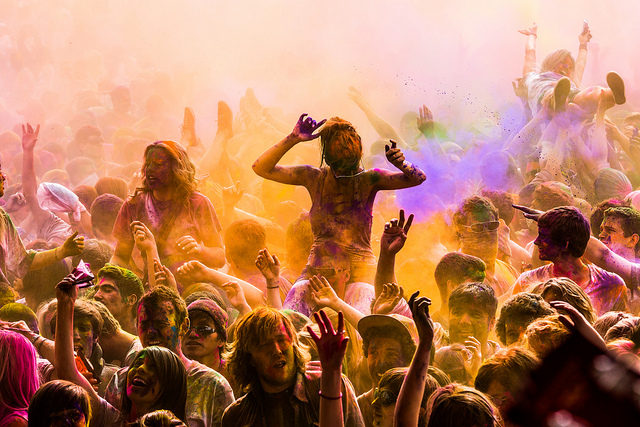
I could write you a lovely piece of text invoking the spirit of powder dye at a festival. Will you feel exactly as you feel when you see this image? No. Pictures tell a thousand words.
So images improve your readability. They make the reader want to dive in. But optimising an image for SEO does WAY more than that.
We’re going to cover some core elements in this How to guide to image optimisation:
· Knowing when and where to use images
· Finding an image
· Preparing images
When should you use images?

The short answer to this question is that you should always use images. Browsing the web is a visual business. Your audience doesn’t want to wade through reams of dull text. This involves working on the text itself to ensure it isn’t dull. It also involves using images to break it up, make it more interesting, and lead you on.
However, an ‘image’ in this sense doesn’t just have to be a photo, like we’ve used above. It could be a graph, a chart, a flow diagram, a speech box… just something with a dash of difference.
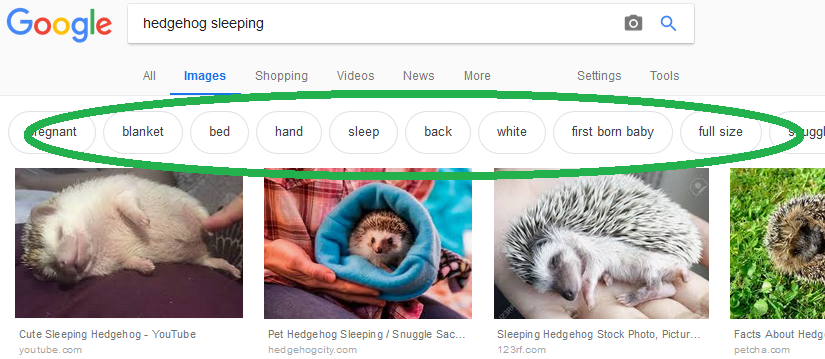
What’s more, Google likes images. They really do. You get a nice leg up in the SEO war. This is happening as Google itself gets better at ‘reading’ images. In fact, they recently (Sept 18) released a brand new Google Images interface. Search for an image now, and you’ll find something that looks like this:

No, we haven’t just done this to make you go “aw, cute, sleepy baby hedgehogs”, although we’ll let you off if you do. We’re doing this so that you can see that the Google Images interface tells you some useful stuff.
You’ve got filters:
You’ve got meta data (we talk about this in some of our other posts, such as this one):
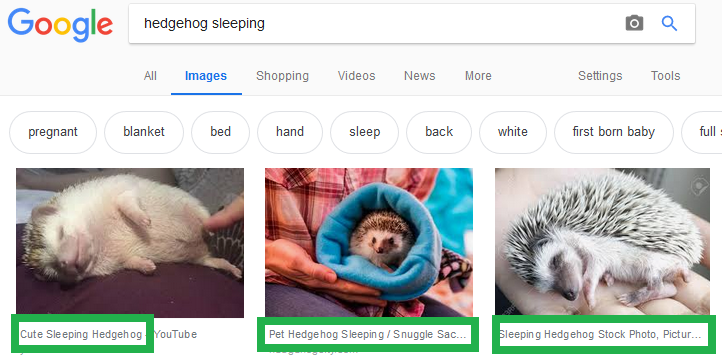
And you’ve got an attribution:

This tells you two things: what Google knows; and, what you should use.
Ok, ok, you get it, you need to use images. Assuming you don’t have a hobby as a photographer which just happens to tie in with what you’re writing about, where do you find your images?
It’s not just any image
Let’s start by pointing out that you don’t want to lob any old image in to your post and hope for the best. You need to be more image optimisation savvy than that.
Your starting point should always be to consider if you have an original photo which conveys your message. Originality is top notch awesome for imagery. So, your page is talking about your team? For the love of all things please make it a real genuine snap of your smiling mugs.

Photo by rawpixel
However, much of the time, this probably won’t work. Take me for example. I’m a bit of a snap happy bod. My trusty DSLR comes with me wherever I go. However, a picture of my kids being pickles or my latest visit to the local castle, aren’t quite going to cut it when I’m writing about, well, article writing.
So I need to look elsewhere. My image needs to reflect my message. It’s meant to be illustrative… adding something extra to my story…
This is an important point when we consider where the image should go in the text for SEO purposes. The good news is that it should go exactly where you would put it for your reader: to illustrate the point in the text that you are making.
How to find an image to use in article writing
You’re now left with the question of how to find an image if you don’t have a suitable one to hand.
Before you whip out your credit card, you have some other options. Flickr.com is a good place to start. You want to make sure you choose to use Creative Commons, here:
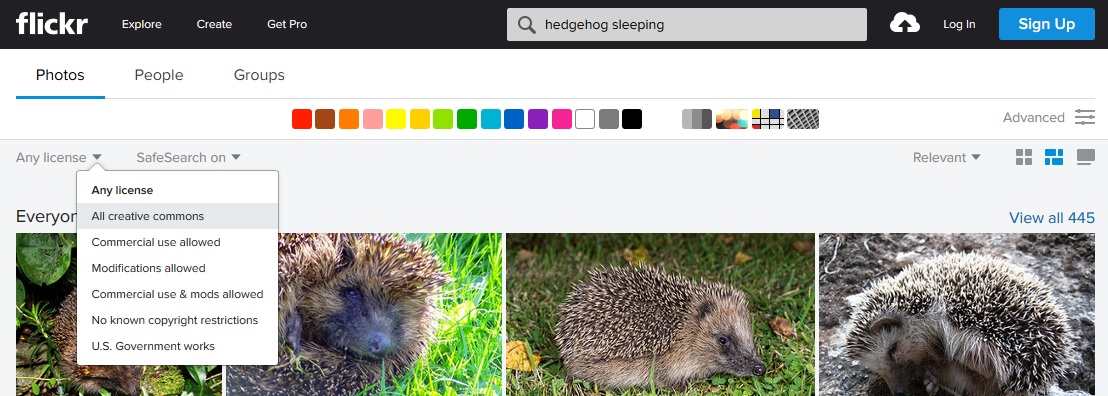
You then need to make sure you attribute the guy or gal who took the shot. That’s the decent thing to do.
It’s considered ‘not cool’ to pinch someone else’s photo without their permission, and certainly not without attribution. So, avoid pinching from other blogs and sites and stick to sites like Flickr, Unsplash, Pixabay, or Foter.
Having entered your search terms, try to find one which looks ‘genuine’ rather than ‘stock’.
Sometimes an image itself isn’t exactly what you need. There are plenty of alternative options. Feeling arty? Illustrations are great. Graphics, top notch. Graphs and charts, we love them. We should also tip our hat to animated GIFs. They may irritate the wotsit out of us, but the masses love them. Just be a little careful as they can slow down the loading time of your page.
So, you’ve got your image, now you just pop it in the article and go, right? Not quite. Hold your horses, you need to prepare your image and optimise it for SEO.
Preparing images for article writing
Remember, we’re not just talking photos here. An image could be a graphs, illustrations or photos.
You need to look at the following elements to make an image SEO friendly:
· The file name
· The size
· The responsiveness
Image optimisation: File name
Starting to optimise the image for SEO starts with the file name. Now, Google might be darn clever but as yet, they can’t actually ‘read’ photos. They can, however, read text associated with the photo.
The first piece of this text is the file name. So if you have a keyword or keyphrase, you need to pop it in the file name. So scrap your 1-5462.jpg name and call it baby-hedgehog-sleeping.jpg.
Image optimisation: Size
Google ranks sites according to loading times. Images, nasty blighters that they are, can have a seriously negative effect on loading times. So you need to get the balance just right between the image being clear, and not being oversized.
So spend a few moments resizing an image so that it is exactly the right size for the display size.
You also need to pay attention to the file size. You can do this by experimenting with percentage drops. However, this can be laborious. You can use various paid for tools such as ImageOptim or JPEGmini to reduce them further. However, none of them are cheap so you may prefer to just trial and error yourself.
Responsive images
When you open a web page on a laptop, tablet or mobile phone, the display needs to be responsive. This means it needs to fit and look right, whatever device it is being viewed on. The proportions of different screens vary.
This means that images within a web page also need to be responsive. This is done automatically by various website creation platforms, such as WordPress or Squarespace. However, if you’re not sure if your platform does, pop an image in a blog post and go and open it on different devices to see.
You’re now not a million miles away from being ready to put your image in the article.
Putting an image in your article writing
There’s no doubting that Google will continue to get cleverer. However, it’s still not capable of looking at the picture at the start of this article and saying: “Yep, crowd of people (likely inebriated) with colourful chalk all over them”. Much that we wonder if Google is Big Brother, it’s not quite got the hang of that bit just yet.
So you need to do some things to add some content to the image.
There are two main ways in which you can do this:
· Captions
· Alt text and title text
Captions
Captions are the small amount of text which goes under an image. So in the following screenshot from a previous blog post the caption is circled in orange:
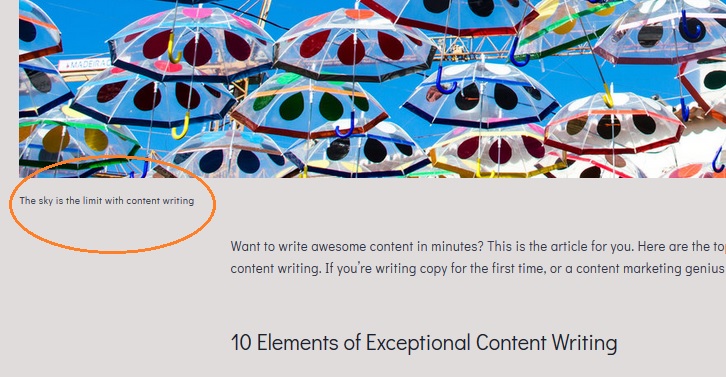
Most website platforms will prompt you to enter this when you upload an image.
Captions are also handy for Joe Bloggs who is scanning your article. Captions stand out, along with things like titles and bullet points.
This doesn’t mean you should always use a caption. Sometimes it will feel clunky and out of place.
Alt text and title text
The alt text, sometimes referred to as the alt tag, is a small piece of descriptive text which accompanies the image. This text is displayed if the image doesn’t load for any reason. And whilst Google can’t read an image, they can read the alt text. Making it super-duper for SEO.
Therefore you should always use alt text when using images. Ideally, include the keyword or phrase you’re targeting with that page. However, you need to get a good balance here: both your reader and the search engines need to be able to make sense of what you’re saying.
You may need to do some research about how to use alt text in your particular development platform. It’s not always a straightforward case of typing some text in to a box conveniently labelled ‘alt text’.
It’s worth using the same text for the alt tag and the title tag. They are basically saying the same thing, after all.
Get set, post image
That’s it, you’re ready to go! Now your SEO writing just got a nice little boost through image optimisation.
Chrissie Brown is head writing ninja at The Content Ninja. When she’s not to be found writing, she’s found with a camera in hand, snapping away.

